PW Texan amplifier and the PE Rondo SQ system.
R. Mann's famous, 'value-for-money and skimpily screened' Practical Wireless (May 1972) Texan amplifier (based on Derek Skinner's B80 class B design) was copied extensively. Appearing in a number of references, it is an easy layout to tinker with. In response to the call 'anyone got copies of the original articles?', Tony Harker and Nigel Eames have responded and PDFs can be supplied on request. Bo Samuelsson shows a variation with a Larsholt tuner added. An innovative installation made a quad system into a simple shelf across a room. This included the tuner, tape, central heating and lighting controls (pre-video days!).
Ian Juniper has sent some excellent notes and photographs which are sure to stir feelings of nostalgia amongst those who've built and used the Texan. The liberty has been taken to include these below.
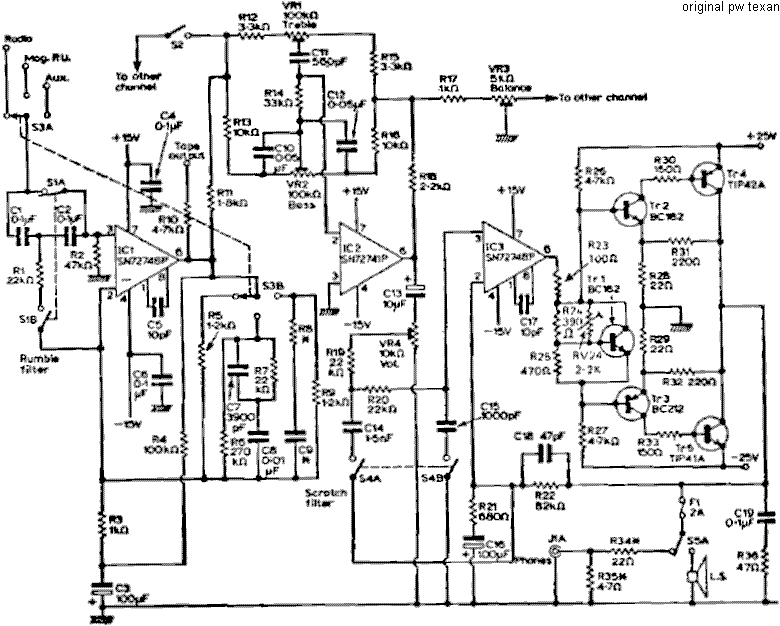
The Texan's radio position gave a 20W output into 8R with a 30mV input (which could be too sensitive for some tuners), covering <5Hz to 500kHz. The balance control's range was ±12dB, relative one channel to the other, the bass ±17dB @ 14Hz and the treble ±11dB @ 27kHz. A 'better' UK system would have included a Garrard SP25/AP76 with a Goldring G800 or Shure cartridge and a pair of 'Linton/Glendale' type speakers. A nice cassette deck would be, say, an Akai GXC-46D or an open-reel like the Sony TC-377 or Akai 4000DS. Doing well in blind tests, what was useful was that, in any stereo, it was the smallest part, many commenting favourably on it's performance versus it's size.
Follow-on mods ('The Texan Revisited') included uprating to 30W (25-0-25V toroidal transformer with 'B' output pairs), a tape monitor function utilising the existing mono/stereo switch via a BC182 buffer and necessary RFI suppression (the Powertran T30+30 embodied these). The output upgrade was welcomed since the original Gardner's transformer (20-0-20V @ 1A), though screened, slim-line (1½" high) and having a low stray-field, showed a regulation of about 3Vrms between no load and a continuous sine output of 20W into 8 ohms. DC rail variations were as follows; quiescent = ±32V, 20W sine into 8ohms (one channel) = ±23V and driving both channels at 16W sine into 8ohms = ±17V. The 3m5F (50V in the Henry's version) smoothers were fed by a 1N4001 bridge.
Anyone familiar with the Texan would have spotted the similarities with the following year's Practical Electronics Rondo SQ/QS/CD4 system immediately. It would seem that in order to demonstrate the CBS SQ system, and it's extensions, the PW Texan was adopted by PE design staff for the peripheries, and then given push-button and slider 'modernity'. Haste appears to have resulted in the Rondo's output RC networks being fitted almost as an after-thought to their PCB's undersides, there being no prepared positions for them. The Texan's teak sleeve and metal frontage, however, were, it is felt, more distinctive.
The Rondo was, in effect, the MkII version of the Texan, differing only marginally by the inclusion of emitter resistors (R29 & R30). The feedback path in the Darlington output pairs (R23, R24, R26 & R27) intends to reduce the gain, harmonic distortion and intermodulation products of the op-amp stage, the output swing limited partly by it's DC swing capability but mainly by it's slew rate, 1V/µS, in this case. The supply for this was derived from the main rails via 15V zeners, 680R Rs and 1mF smoothers. Slower but higher current output transistors (2MHz, 10A, 60V, 90W) were specified for the Rondo compared to the Texan's TIP41/2As (3MHz, 6A, 60V, 65W). The TIP2955/3055 types were faster (8MHz) with a lower gain. Although all those mentioned on this page will fit both amps, the author prefered a 2N6488/91 pair (5MHz, 15A, 90V, 75W).
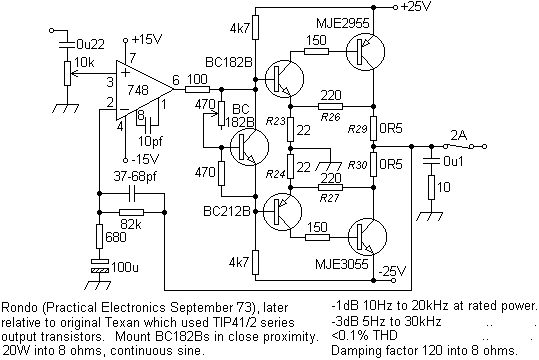
The use of an op-amp eased the construction of the differential input stage and attendant offset issues. Mount drivers and bias transistor on heat-sink between output devices or thermally mate the BC182Bs, to provide thermal tracking of the bias. Swap positions of 470R bias resistors, making variable 1K, connecting open end to wiper to avoid problems with intermittent wiper. The Texan's quiescent pot could be paralleled with an additional resistor if the adjustment was too coarse and the quiescent current could range between 10-40mA, the Rondo's recommended value being 20mA.
Some mods include uprating the mains transformer to 25-0-25VAC, output transistors for higher speed, higher voltage types and replacing opamp with dual higher spec, lower noise versions (4559, NE5532, etc), reduce gain by a factor of five, add RFI suppression, uprate feedback DC blocking cap, bypass fuse, increase heat-sinking, and fit inverse protection diodes. Result is economical, pleasing and compact.

If fuses are fitted in the supply lines instead of the output, the 220R 1W resistor can be removed. This was introduced to reduce non-linearities arising from the heating and cooling of the fuse, particularly with bass frequencies. To reduce RFI, input filtering or a 33pF (or more) cap across the opamp inputs can help. Interaction with the 10-47pf cap across the feedback resistor may cause oscillation, ballasting this cap with a low value resistance, say 68R, (input side) can prevent this. Where the op-amp is satisfactory, reducing the current stage's gain can be considered. An amplifier of this size (20-50W) needs a slew-rate of 8-14V/µS.
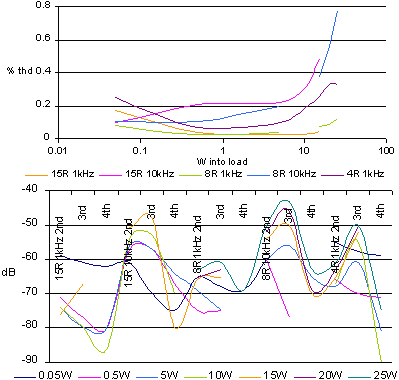
The author holds that the high gain of the power amplifiers (>120 for the T20 and Rondo, 154 for the T30) contributed to susceptibilty to switching phenomena, increased noise and poorer HF performance, although distortion at low-levels was reasonable (Texan's shown below). Some users, including the author, noted imbalances at low levels possibly due to the tolerances inherent in the volume control. Reducing the gain of the power amps moves the point at which normal low-level listening occurs further up the pot's tracks, where they are more likely to have a comparatively closer match.
With the above considerations, outcome is faster, with less noise and a bit more reserve power. Additional smoothing/decoupling can only improve further. For example, in both designs the op-amp supply rails, other than the smoothing across their zeners, had none. The same could be said for the PA's. An output inductor was considered but not found necessary. Load output with 8 ohms or more for best results.
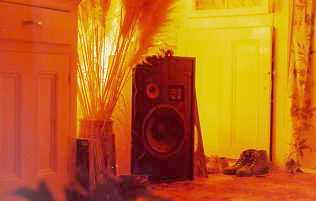
Both amplifier's output devices were bolted to a thin bracket (16swg). Bringing these to the PCB edge would have allowed direct mounting to something more substantial. A Redpoint finned heatsink (2.4°C/W, 51mm high) worked well with a stereo layout (standard Texan 20) driving 71 litre passive 3-way infinite baffle enclosures (Q = 0.7) using 12" 300W Electrovoice bass units (30Hz).
This particular amplifier's tuner socket was wired to carry a supply used to power ancillary equipment, like tuners, and ran faultlessly for twenty years before it was given away having been replaced by a much bigger Technics (SU-V6) which gave greater detail, particularly at high volumes. In comparison, the Technics has, in it's life (>20 years), developed two failures, one a main smoother and the other, a RIAA input FET.
Some builds, using single opamps, have dispensed with the DC blocking cap altogether, utilising the opamp's offset null facility.
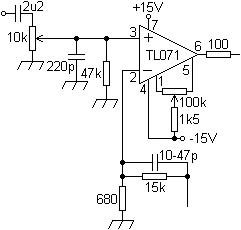
One design (Texan) was modified by making a piece of strip-board, carrying new opamps, other components and off-setting controls, that then plugged directly into the two sockets of the original ICs on the PCB, redundant items having been removed. As a guide, 748s can be replaced by TL070s and 741s by TL071s.
The author has used compact strip-board mounted versions of these amplifiers to replace unobtainable commercial output modules with success. To get a neat fit, simply fix the new output transistors by means of the old module's screw-holes before soldering to the strip-board. Where possible, the existing heat-sink can even be removed to provide a firm base for the rest of the construction. At the same time, improvements to supply wiring and smoothing can be made, if necessary.
In their original forms, the Texan offered a 'slimline' stereo integrated amplifier, and the Rondo an AM/FM radio, pluggable 'entry-level' SQ decoder (MC1312P) that could be extended, four power amplifiers, tone controls, volume, balance, etc. The preamps (DIN standard) and RIAA eq were virtually identical, bar the inclusion of scratch and rumble filters and the use of a 741 in the Texan's tone controls, opposed to a 748 and minor variations in the Rondo.

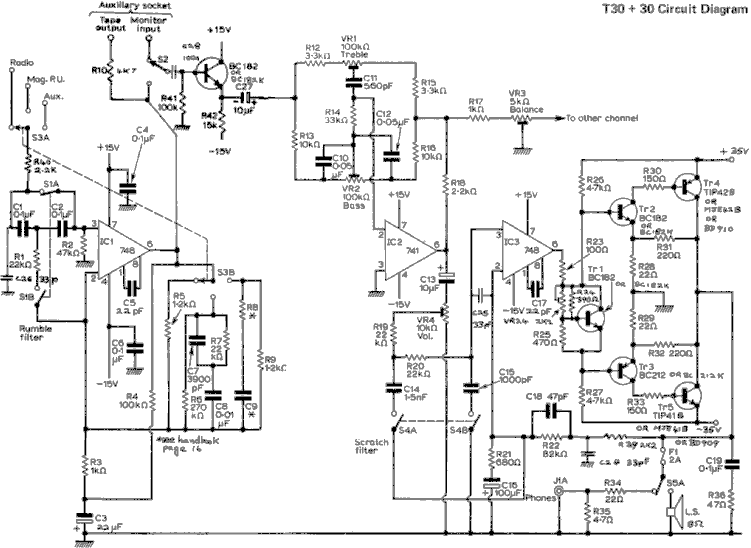
The diagram above shows the input options available and not the 3-way input selection actually used in the Texan. This includes one of the 2k2/33pF combinations suggested later ("The Texan Revisited") to reduce RFI. Comparing to the Powertran T30+30 diagram at the bottom of the page, one can see the capacitor decoupling the feedback loop has been reduced from 100µF to 22µF and reversed and the opamp compensation caps have been increased to 22pF.
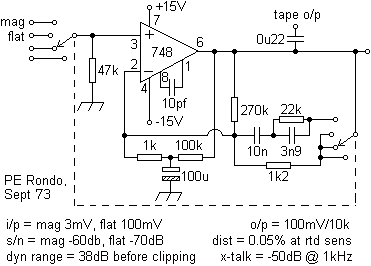
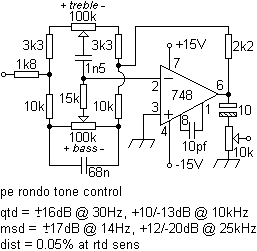
The 270k resistor used in the RIAA eq in the Texan remains in circuit with the Rondo. This was intended to reduce instabilities during switching arising from momentarily open-circuiting the feedback loop. The quad selector sat between the Rondo's tone controls and PAs, the tone/output pots being ganged and the PA's being single thus facilitating balance between the four channels. 4-track tape record and play was provided. The quad decoder plugged into this.
A very popular design, perhaps representing many first attempts at a 'serious' electronic project, the original Texan kits were sold by Henry's Radio Ltd (£28.50), later versions being marketed by Powertran (T20+20 & T30+30) and others for nigh on a decade being, truly, a marketing success. Most could be built in an evening, even the connecting wires having been cut to length and stripped.
Some saw the Texan as Texas Instrument's response to the much more complex, Ferranti-influenced Gemini published in Practical Electronics a year earlier. Although the output of this was AC coupled, the output devices are configured similarly, with those used in the Gemini being specified for the Rondo. Using op-amps, PCB-mounted controls and a DC-coupled output, the Texan was more 'modern', and cheaper (compared to the Gemini's £45), with finished case parts! Here are some later, but similar, versions. Commercial variants included the Riga Brio. In 1975 PE carried the Orion by the Gemini's designers which some saw as a discrete version of the Texan. This used a similar layout and transformer.
Over the intervening years, thought has been been given to 'revisiting' the Texan design (in it's original sleeve). For example, notwithstanding the fitting of a heat-sink (mentioned above), MOSFETs or ICs could be used in the power amp, an HA12017-based RIAA stage on a pluggable board and mounting resistors upright would free up PCB space, RCA phono connectors, electronic switching or even remote control could be included. One smoother could be moved to the front so that a filtered mains socket can be fitted between the transformer and side panel, a soft-start sitting by the mains switch. Or, the existing PCB can be retained with 'improvements'. One system comprised matching, multiple and modified mono-block units. If the reader has had any thoughts in these contexts then contact me.
Ian Juniper's notes and photos;
"This is a description of the repairs and alterations which I have carried out on my amplifier and I am attaching some photos which may be of use.
Were I now to consider building a T20+20 from scratch, I think I would make the chassis components from sheet aluminium rather than steel. I don't know whether this would have any adverse effect on the shielding of the power supply components, but it is much more readily obtainable and easier to work with hand tools. It would also improve heatsinking. Construction of a chassis could be done without recourse to a panbrake for making angles and I would suggest the use of 3mm screws and nuts instead of the almost-ancient 6BA hardware.
I have a PW Texan T20+20 stereo amplifier kit which was purchased around 1974 or 1975 and which continues to give excellent service after over 30 years of daily use. Sound output is through a pair of B&W DW4 speakers and I doubt whether I ever run them at more than a couple of watts for an adequate listening level.
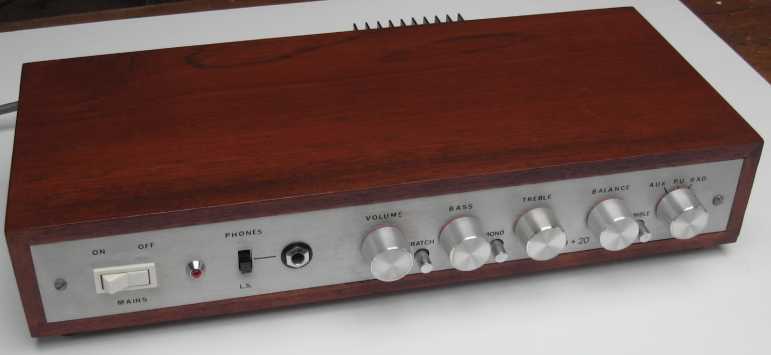
During this time only a few components have required replacing to rectify faults but I have introduced some simple modifications which I hope have been enhancements.
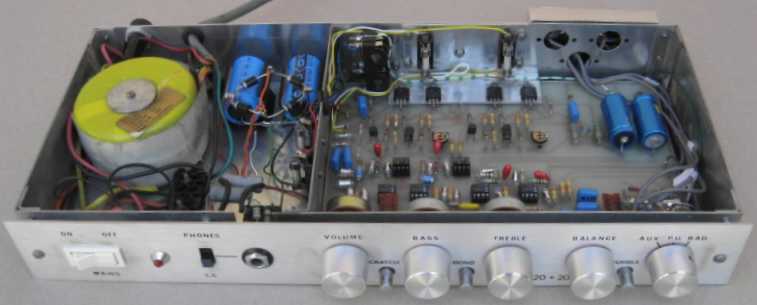
After about ten years the dual volume control was becoming a little scratchy so I replaced it with a similar one. One of the 3300uF/40v power electrolytic capacitors blew in September 2002 and I replaced them both with 4700uF/50v capacitors and at the same time replaced the 1N4002 rectifier diodes with 1N5404 (3 amp) ones in case there might be a higher current surge when switching on.
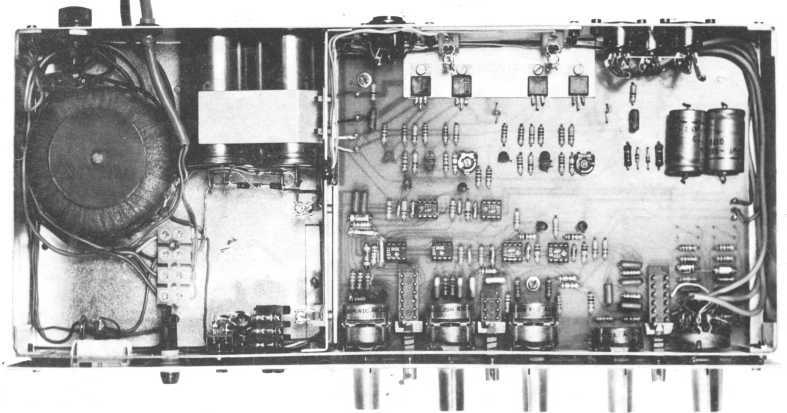
(Compare to previous year's Gemini's wiring).
My audio equipment includes stereo inputs from a CD player (500mV), AM/FM tuner (775mV), a stereo VCR (330mV), and a twin-deck cassette player (500mV). For a while, in an attempt to level out the input voltages to the T20+20 specifications (radio 30mV, tape 30mV), I incorporated simple resistive attenuators in the 5-pin DIN plugs because I had long felt that at very low volume settings of the volume control there seemed to be an imbalance in sound level from the two speakers, and this was done in an an attempt to overcome it.
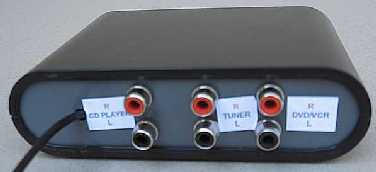
This was never really the last word and I soon moved the attenuation networks into a 3-position switch box into which I fed the outputs from the various audio sources. The level of the selected signal source is adjusted with a dual log 200kohm potentiometer, which serves as an extra volume control and is very useful when setting the recording input level to the tape recorder without affecting the listening level of the speakers.
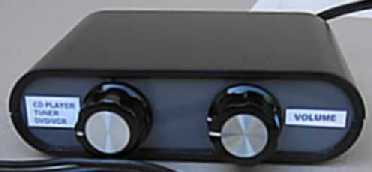
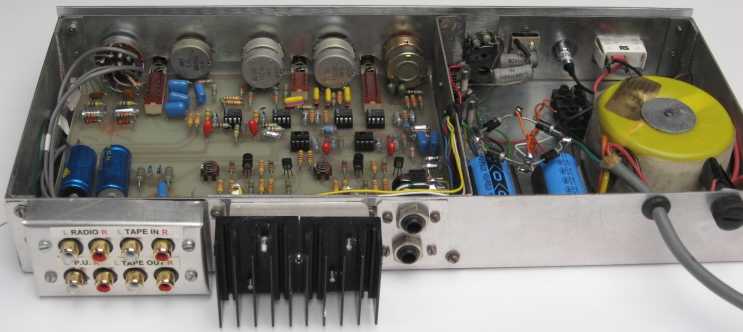
Eventually I came to dislike the DIN connectors intensely, particularly the 2-pin speaker plugs which often seemed to be making poor contacts, and in August 2005 I replaced the 5-pin DIN sockets with RCA sockets which I mounted in a small aluminium attachment to the real of the chassis. The 2-pin DIN speaker sockets were replaced with a pair of far more robust insulated 6.5mm sockets and jack plugs and I have never had any speaker 'dropouts' since.
Somewhere along the line, possibly noting a suggestion in the dear old Practical Wireless in the 1970s, I tried replacing the LM741s in IC1, IC101, IC2 and IC202 with LF351 FET op-amps, which have a much faster slew rate (13uV/s, as against 0.5uV/s for the 741s) but it would take far more sensitive ears than mine to detect the slightest difference in sound output!
My latest modification seemed a matter of prudence if not of necessity. During the recent bushfire season here in Sydney the temperature indoors was 38°C and I noted that the back of the amplifier chassis was almost too hot to touch, so I decided to add a heatsink similar to the one shown on the back of the T30+30 amplifier in the construction booklet, which I might add in passing is not nearly as comprehensive and informative as the booklet which accompanied my T20+20.
One day I may get around to replacing the rear steel panel of the amplifier chass with a piece of suitably drilled 2-3mm aluminium strip to which the insulated speaker sockets and the RCA input sockets could be directly attached. This would serve to improve the heatsinking capacity of the chassis and would tidy up the appearance of the back considerably.
Oh yes, the teak cover of my amplifier was beginning to look its age, so while the chassis was out of it I rubbed it down and applied an epoxy resin coat and it now looks ready to serve for another 30 years.
Regarding the higher-powered T30+30, in which the output voltage of the toroidal power transformer was raised from 20+20 volts to 25+25 volts and the output transistors upgraded from TIP41A and TIP42A to TIP41B and TIP 42B (or MJE41B abd MJE42B), the other principal change appears to have been to use the original stereo/mono switch as a tape monitor facility, with an extra transistor added to each channel to serve as a buffer to ensure that the tone control is driven from a low impedance. These show in a photograph as a cluster of components and a few loose wires around the former press-button mono switch, but as the booklet points out, this is/was a prototype and subject to change. It is also possible that the augmentation of the heatsinking was being considered at this time, but there is no mention in my T30+30 booklet of the heatsink which appears in the photograph on the back cover.
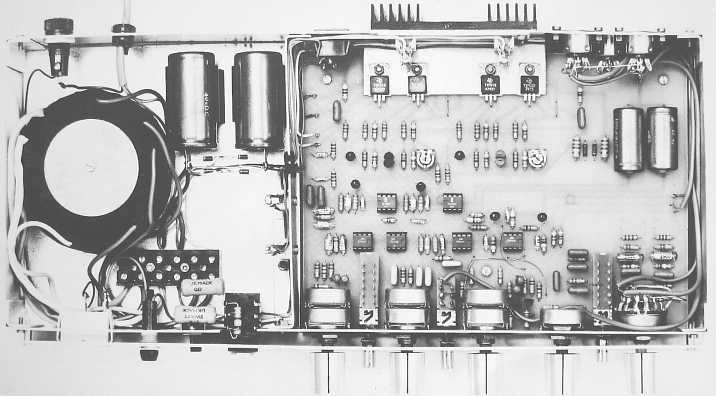
Ian Juniper,
(12 February 2009)."
especially if you want additional content to this page
or if you find any links that don't work. Don't forget
to add the page title or URL. Take care!