Noise measurements
Frequency responses can be obtained relatively easily on a bench. However, some means were required to make comparative measurements of noise and the outputs from microphones and preamps. A small area had been prepared for this as far as possible from any mains wiring. A substantial earthed steel cabinet had been rafted and lined with thick foam. This was used to contain the gear under test preventing any movement of items or air-flow. A smaller, movable steel box within, also bonded to earth, was used to provide additional screening for small assemblies. A Wien-bridge oscillator provided a small speaker with a low-level sine wave and low-noise amplifiers, using HA12017, ZN459 and SL561 ICs, were built up using low-noise passive components and an excess of screening and smoothing. To reduce the incidence of external noise, batteries were used for the ZN459 and SL561 amplifiers and hum filters fitted in the supplies of other circuits. The bandwidth of these covered the entire audio range and in use would reside in the cabinet.
It had already been determined that measurements should be made in the early hours of the morning, when the rest of humanity was dormant and thus inactive. On an intermittent basis, a whole system under test had 'flooded' with a low frequency sound. So low, in fact, it was inaudible. Such was the intensity of this flood that no meaningful measurements could be made, and work had to stop. Prolonged tests found no fault with the equipment and eventually the source was found to be caused by buses standing for long periods with their engines running at a stop three streets away, the test area being in a large stone-built cellar. Similar problems can be caused by trains, other road transport and aircraft. Sources of RFI such as fluorescents, dimmers, central heating, CB radio, etc, also have to be considered and removed.
Naturally, when working with amplifiers it is useful to be able to measure signals over a wide frequency range. However, account must be taken of differing bandwidths of systems when measuring noise since a quieter circuit employing lower noise, but a larger bandwidth, might well give a higher reading, since the noise being measured may be inaudibly high in frequency content. Thus ideally, one compares like bandwidth with like, and filters were made to achieve this, and to eliminate any guesswork. These were fed by the equipment under test and/or the low-noise amplifiers via a stepped attenuator, which also gave a monitor output. An A-weighted filter approximates human hearing, peaking at about 3kHz (0dB, -30dB @ 50Hz and 80kHz).
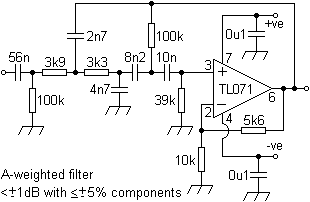
Unfortunately, A-weighted filtering can mask, say, low frequency noise, reducing objectionable 2nd and 3rd line harmonics by 20dB and 12dB respectively (favoured with manufacturer's since a S/N ratio can be reduced by 10dB, or more), eg;

A filter with a roll-off of 22kHz will reveal these. For a wideband measurement, no filter may be used.

To interface the test system with meters the next circuits followed the filter (detailed description is given in the Texas Instruments '84/'85 Bifet Design Manual).
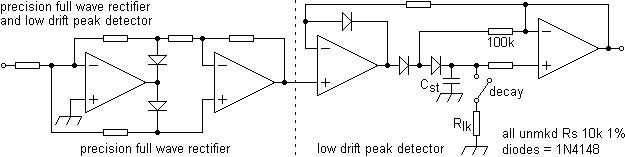
Switching the load (Rlk) in enabled more rapid comparisons and was used to 'reset' the output between readings. If desired, a log amp can sit between the two.
Using TL07x series opamps, the rectifier was useful to 100kHz, although operation to 500kHz with other opamps and 1N914 diodes is possible. If residual DC is troublesome this can be overcome by using single opamps and nulling the offset. To achieve a low drift, the storage capacitor (Cst) should have a low dielectric loss, such as a polystyrene or preferably teflon type. The peak detector was modified by mounting a switchable load (Rlk) across Cst to give a decay. This resistor was chosen to give an output at the rms value of a 1kHz sine wave input. The output then fed a DVM and a VU meter.
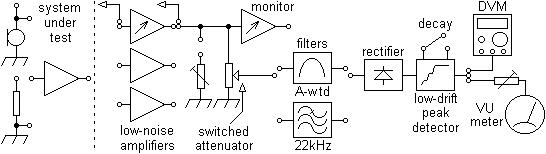
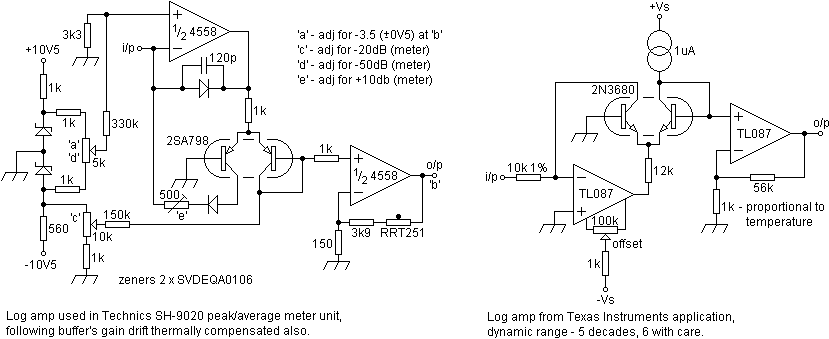
Other indicators can be used, eg;

Another useful level indicator using cascaded LM3914s to drive 20 LEDs was given by Quentin Rice (Wireless World, Aug', '80, P31/3). This included sensitivity and decay controls with an infinite hold and bar/dot pins.
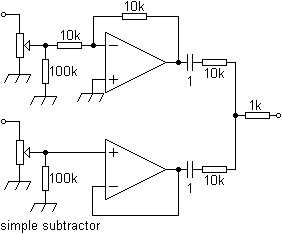
When dealing with PAs say it can be useful to subtract the input from the output. Artefacts, like cross-over distortion and oscillations, can then be easier to spot with a variety of frequencies and waveforms.
For test systems supplied by batteries (±8V max), TLC2201 opamps can be more suitable.
Before measurements were taken, the equipment was allowed to stabilise for half an hour. For best results, prior to, say, a new design being tested, the noise from the complete measurement system should be recorded first. This can then be subtracted from the new data, measurements then being made over ten second periods. A number of readings can be taken over time to identify and eliminate peaks arising from intermittent external sources. It may then be decided to adopt a mean or average value with which to work. With care, very useful confidence, accuracy and repeatability can result at surprisingly very low levels.
The lower the impedance of an input load, the lower the output noise. For example, an input of 43R can yield, with one design, a wideband output noise measurement of 1.15mV, whereas 3k3 will give 5.3mV. Meaningful comparative results are achieved with a realistic resistive load, a standard being 150R. The residual noise of 'heads' was tested with resistive input loads comprised of non-inductive wirewound or paralleled metal-film resistors, matching the intended microphone impedances, or with shorted inputs. The latter can interest but will yield the lowest figure which may not have significance in practical use. Open-circuit inputs will yield higher noise levels but can identify other areas that might concern like RFI, supply noise or oscillation. Consideration can also be given to noise from connecting leads. With preamps fitted with input sockets, screened plugs with the relevant resistor fitted saved time. Load models can be used with RIAA preamps. Power amps can be tested with shorted inputs and then a more realistic 1k resistor at the end of 20' (6m) of screened cable, both approaches yielding very similar results. When testing the noise levels of power amps, ensure the test rig's inputs are clamped to prevent accidental/incidental damage (see Input Protection). Any mechanical contacts (switches, connectors, etc) in the signal path should be thoroughly cleaned and lubricated before testing.
When comparing microphone outputs either to select or match for an array, the distance from the signal source and the mounting must be identical. A greater set distance between a source and microphone yields a smaller error. To avoid connector noise, use soldered joints to twisted flying leads already fitted to the microphone capsules.
It had been intended to create a very simple, but effective, system that can, however, be easily expanded and adapted to a variety of needs. Different filters can be used to fulfill a number of functions. For example, a steep notch filter in conjunction with a low-distortion spot frequency generator can be added to arrive at a THD + N figure. Any (sine) source should be followed by filtering to remove the harmonics generated by the source. A 'scope/spectrum analyser is best fed from before the monitor and can be used in conjunction with a sweep generator, etc, etc. The following variable filter was used to subjectively determine bandwidths before a fixed type was built. The permutations possible are left to the reader.

Wilfried Adam's "Designing low-noise audio amplifiers", in June '89's Electronics & Wireless World, is recommended with some filter designs that might be useful.
especially if you want additional content to this page
or if you find any links that don't work. Don't forget
to add the page title or URL. Take care!